Saturday, September 6, 2014

The Road to Hana Saturday, July 26th, 2014

We survived the Road to Hana!
On July 25th, we left for our bi-yearly Hawaiian vacation.  The day had arrived that we had awaited since August 12, 2012, the day we left Maui two years ago.  Our Hawaiian vacations are two weeks of intense activity and intense family time, family which includes my parents, and has included my sister's family, my brother in law, and any friends we have met up with along the way. Our way of unwinding before coming home for our last three Hawaiian vacations has been to head to Hana, Maui and spent a few nights in this quiet oasis away from the Maui hubbub. This year however our island order was switched, and we wound up finishing our vacation on Kauai--meaning no Hana getaway.  If we wanted to see our beloved Hana on this trip to Maui, it was going to need to be a day trip, so that's what we did.

Vacationers avoid Hana because of the distance from the centers of activity and the "road to Hana's" very illustrious reputation for traffic and being windy.  This is a mistake.  The Road to Hana and the destinations waiting along it's path can easily be completed in a day if that is what you have.

Here are a few pointers from someone who has made this trek often--seven times so far.

It is imperative to start early.  We took advantage of our jet lag and left our hotel on Ka'anapali Beach at 6:10 AM.  This allowed us to be crossing through Paia before 8, to Ching's Pond by about 8:30, snorkeling in Hana Bay by 10, back to Waianapanapa State Park by 12 and to Hamoa Beach by 130.  We left Hamoa Beach by 4pm and were home by 8, and that included stops at Costco for gas, the liquor store, and Safeway.
By leaving early you do also minimize the traffic on the road, which ALSO minimizes the car sickness.  With a good passenger watching the road ahead, it is possible to roll the stop signs at the one lane bridges rather than constantly stopping and starting.  That's what makes ME sick anyway.

The road really isn't that bad.  Some rental car agreements will tell you that your 2WD rental
Waikani Falls (aka The Three Bears)
Took this one from the highway!
car is not insured if you drive "all the way around," which means that instead of turning around and returning to Kahalui the windy way you came, you drive past Kipahulu, through upcountry around the other side of Haleakala to return to Kahalui.  Frankly, for a day trip, we have NEVER not driven all the way around.  We have always driven a two wheel drive minivan, and we've always survived.  Though there are parts beyond Kipahulu which are narrow and rough (even a five mile stretch of dirt road), and there is no doubt that caution is in order, there is no real reason to avoid it.  Ask the ranger at O'heo Gulch if the road is open and drive carefully.  It's different scenery, is less windy, has almost no stop signs, and in my opinion, takes less time.


It is absolutely necessary to carry with you the latest edition of Maui Revealed by Andrew Doughty.  We purchase the latest edition of this book every time we go to Maui.  It is a guidebook like no other.  The authors describe the Road to Hana in significant detail, frankly pointing out what stops are worth a look and which are not.  In some regard, this is a formal endorsement of this book.  Our trips to Hana would have been significantly lacking had we not had this publication in tow.  Recently our friends wanted advice on how to spend their Hana day.  I sent them right to the book.

Two things you will need to take with you--food and gas.  It's in short supply out here.

When taking a day trip to Hana, you can't see everything, but this is where we stopped this time......

Ching's Pond

Who is Ching anyway?

Ching's Pond is a lovely little freshwater pond and waterfall just below the highway right before the 17 mile marker, not far beyond the Keanae Peninsula.  Right before the bridge, pull to the right and park.  Cross the highway carefully and take the path right past the no swimming sign down to the idyllic setting below.  As with nearly all little known idyllic settings, closed water shoes are a must during your entire visit to Ching's Pond.  Between the mud, sharp rocks underwater and uneven climbing surfaces, flip flops are a recipe for
disaster.  Flip flops and adventure in Hawaii DO NOT GO TOGETHER!

The water is super cold, more like an arctic lake than a tropical pond, but refreshing when
you get used to it.  The area has plenty of platforms from which to jump into the deep water, the most popular being near the waterfall into a 10 foot diameter opening, the only area deep enough.  From 8-10 feet up this is pretty easy to do without killing yourself, but the area is heavily visited by foolhardy local youth who jump 25 feet from just below the bridge into to this same space.  I don't have enough life insurance for such a challenge!
You will not have the place to yourself.  There is potential I suppose from stink-eye from the locals, but we have never had any problems--which brings me to the story of the naked guy.

I hesitate to tell this story but it was part of our experience.  We got to Ching's Pond by about 8 am and had the place all to ourselves, but it was not long until we were joined by a local vagrant dressed in one sock and a sarong, who decided it was time for his weekly bath, and in so doing stripped himself of all his garments and went swimming. Hmmm...

He didn't bother us, approach us, or talk to us in any way.  He just went and did his thing, whatever that was, over by the waterfall where we couldn't really see him.  Nonetheless, it was quite creepy, not to mention revolting (there is nothing good about the combination of nudity and cold water) so I have to admit we were uncomfortable and cut our time here short. It's a fairly small area so averting your gaze forever is not so simple. The final nail in the coffin was when he decided to dry himself by laying on the rocks in the sun..."time to go, kids, and by the way, DON'T LOOK AT THE NAKED GUY!!"

When I was arriving at the car, a large truck pulled over the bridge.  He stopped right in the middle of the highway, and yelled out his window to our naked friend 25 feet below "HEY!!!!  GET SOME CLOTHES ON!!!  THIS IS A COMMUNITY!  THERE ARE KIDS ALL OVER THE PLACE!"  I think at this point he made some attempt to procure some kind of loincloth, but too late--damage done.  I think I'm scarred for life.

Anyway, don't NOT go to Ching's Pond because of the naked guy.  He takes his bath Saturdays at 8am if want to avoid him. 

The usual fun at Ching's Pond

Snorkeling in Hana Bay

Okay.  The best snorkeling on Maui is at Molokini Crater--but you're gonna need some money to get there.  The best snorkeling on Maui that you can get to by land is in Hana Bay--hands down.  Clearest water and a great variety of colorful coral and fish, and NO crowds--maybe because it's not so easy to get to carrying snorkeling gear, neither is entry or exit into the water very easy.

To get there you need to travel all the way to the town of Hana and to Hana Bay.  Now of course you don't just run into the water via the beach--to get to something lovely, as usual, you have to take a 10 minute mildly treacherous hike to get there.  Park at Hana Bay and walk to the very end of the road, past the boat ramp.  Here you will see the beginning of the trail, complete with its own warning sign.  All you do is follow the trail, wearing your closed water shoes of course, along side of the red cinder rock until you get to the lava rocks that jut out over the water, leaving a nice spot to leave your shoes, car keys, etc.  Along the way you have to boulder scramble a little and pull yourself up on some roots.  Another hazard is the red rock itself, which leaves ample evidence that boulders do fall from its faces.  We are sure to keep our eyes and ears widely open, and I actually put my arm above my head, in case a small rock should fall.

Mornings are best.  We were there by ten but have been there by 730 in the past.  It is unlikely you will see another snorkeler.


Wai'anapanapa State Park

If you can say it, Wai'anapanapa is a nice state park located about two miles before Hana at the 32 mile marker.  Here there is a black sand beach, officially Pa'iloa Beach, which is nice to look at and easy to access but bad for swimming. There is also a coastal hike which will take you 3.5 miles to Hana Bay along a lava rock shore line should you so desire.  There is a campground, fairly decent rest rooms (though dark), showers and plenty of picnic tables.  But we weren't there for any of this stuff...

Wai'anapanapa is also home to two spring fed freshwater caves (though only the first is suitable for any worthwhile fun) which are accessed by a short trail on the left side of the parking lot.  This is also another local hot spot, and when we arrived on this day the area was occupied by about 15 teenagers and their chaperones, all trying to outdo each other with there flipping ability.  Of course there is a small cliff and the requisite deep area and cold clear water.  Once you get started with the jumping you find yourself saying over and over, "Just one more time!"

The freshwater cave is yet another closed water shoe experience.

Hamoa Beach

Though many will say that the final destination, the pinnacle of your Road to Hana experience, is the O'heo Gulch, otherwise known sometimes as the "Seven Sacred Pools."  (The Seven Sacred Pools are neither seven, nor sacred, nor pools----discuss.)  We disagree.  We say that it is Hamoa Beach.

Hamoa Beach is consistently named one of Maui's best, and even America's best beaches by varying sources, and there is no doubt there is plenty of fun to be had here.  The beach is located about 10 minutes beyond Hana of Haneoo Road.  There is only street parking, but we arrived at 1pm on a Saturday and were able to park with relative ease.

The beach is a crescent of gray sand.  Shade is available.  The bottom is sandy as opposed to rocky which can make entry and exit at other Hawaiian beaches quite uncomfortable.  There is no lifeguard on duty.  You will notice lounge chairs, an attendant, and a cabana building with some decent looking bathrooms and showers--but stay away unless you are staying at the Travaasa Resort and Spa (a colossal rip off BTW) who has laid claim to these facilities.  For the rest of us low lifes, there is a single unisex restroom behind the building.  Hold your breath and wear your shoes--seriously makes your mom's words, "just go in the ocean" sound a lot better.

Anyway, yeah, the facilities not so nice, but the beach is lovely.  The surf can get rough so you gotta be careful.  You also have to steer yourselves and your kids away from the surfers and their hard pointy boards that can rip your head off.

This was our first day on the island, and not again on our vacation did we experience such great boogie boarding.  I used to really stink at boogie boarding but I've gotten better, and at Hamoa I was riding waves a 100 feet all the way out to the shore where they dissolved into the sand.  We were sore and wiped out after jumping on those boards over and over and over again, but it's hard to stop.  Even I was pulling the "oh, let me just catch a few more waves before we leave" line!


Building sandcastles never loses its charm


The same sandcastle on Hamoa Beach six years ago


Anyway, if it's your first time on "The Road" there are plenty of other places that are worth stopping that we skipped this time including the Venus Pool, the Pipiwai Trail, and Maui Cave Adventures/Ka'eleku Cave just to name a few.  Plan your trip around what you want to see and ENJOY IT!

And here are a few more pictures from past Hana adventures...

Skipping off to the Seven Sacred Pools

Finally actually swimming at O'heo Gulch
(and what do we have on our feet??)

Wailua Falls is between Hamoa Beach and Oheo Gulch

A hunter's road leads to Wailua Iki
(not sure we were allowed to be here!)


The End of Scenic Nahiku Road
 Well that is the end of our Hana adventure, and I've only covered the first day of our trip!  Look for upcoming posts about food and activities on both Kauai and Maui!


Wednesday, July 23, 2014

Glorious Lake Tahoe: July 12 to July 17, 2014

Well, it was off to our yearly trip to Lake Tahoe where we stay in the beautiful vacation home of our friends Dave and Laura.  For more info on this accommodation that you too can rent, check out my post from last year's trip or this link

We had a little trouble scheduling this this year.  At the last minute I decided to put my kids in a theater camp which meant we had to change our reservation dates pretty late in the game.  Luckily, I was successful in making camp/rental/work all line up and we were able to go.

Our Lake Tahoe trips are often full of repeat adventures--the Red Hut, Sand Harbor Beach, jet skiing--so rather than bore you with what we did AGAIN, let me pass on some previously undocumented adventures.

Hiking to the Top of Mt Tallac

Every year we spend a day hiking.  We try to be out for about 6 hours, allowing some time on the other end to visit the beach and soothe tired muscles in the icy cold waters of the lake.

We have done most of the big ones in the South Tahoe area, so we had to pull out the California Hiking book and make a family decision on where to hike.  The family decided to summit Mount Tallac, ranked a 10 out of 10 for scenery and 5 out of 5 for difficulty.  I made a promise to the family that if we were able to complete this hike, we could all go out for ice cream afterward.

Craig and I have done this trail before, 15 years ago, maybe more.  At that time I swore I would never go it again. Nine and a half miles and 7000 feet of elevation (3500 up, 3500 down) later I remembered why.

There are two trailheads that access Mt Tallac, the first, the Mt.Tallac trailhead, which we used, is located 3.8 miles north of the Y.  The other is via the Glen Alpine Trail which starts at the far shore of Fallen Leaf Lake.  The Mt Tallac Trailhead route is shorter, but steeper.

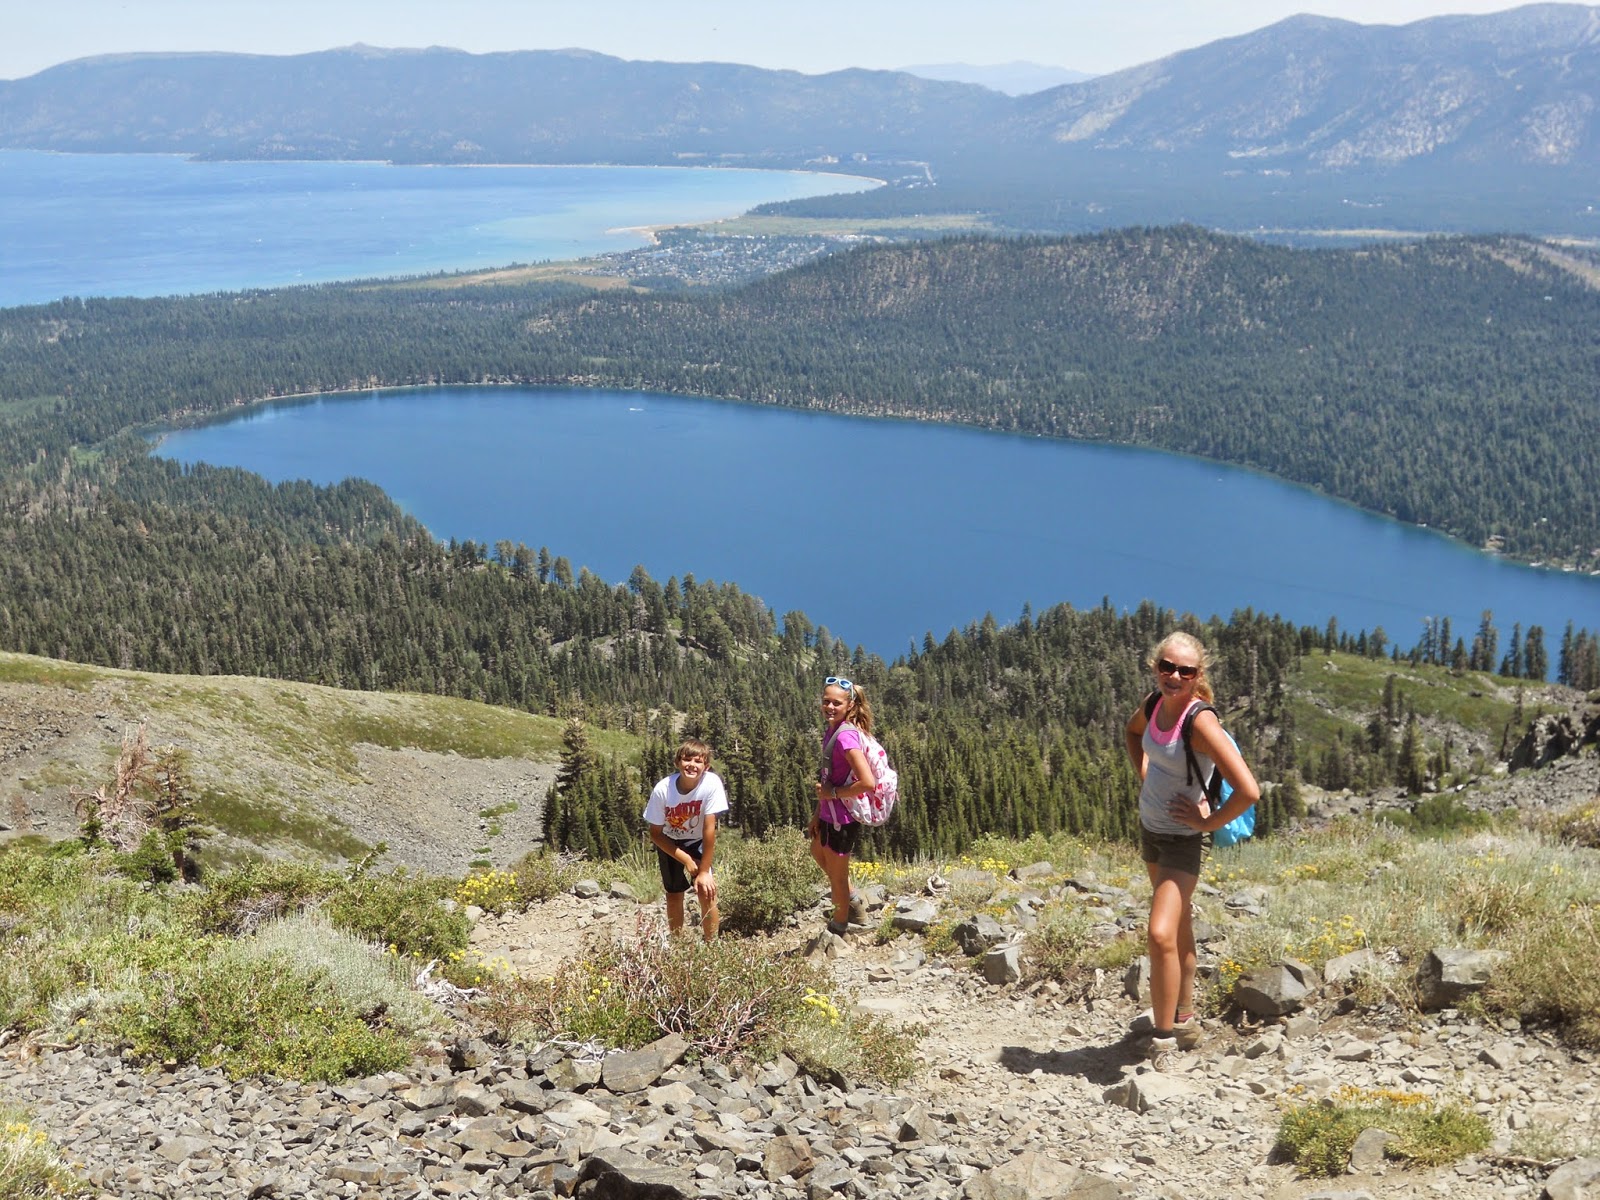
The trail passes in and out of forest initially, with a gradual but steady climb. Very soon you are offered a lovely view overlooking Fallen Leaf Lake on your left with Lake Tahoe behind you.  You pass Floating Lake at about 1.2 miles and then Cathedral Lake at 2.5 miles.  At this
Cathedral Lake
point you are just about half way to your destination, but you aint seen nothin' yet!  From here the intensity of the climb increases mightily, and it's just minutes before you are far above Cathedral Lake.  Here also is the point at which the forest canopy ends, and you are exposed to the direct sunlight as you climb 1000 ft over a very short distance up the face of the mountain to the first summit into the flatter meadows overlooking Desolation Wilderness.  By this time, friends, you are dead, and the energy to press on starts to wane.  This is where the kids started to complain--but visions of rocky road and strawberry cheesecake were strong motivators. Another two miles of steady climbing and some boulder hopping and we were there, overlooking expansive views of Lake Tahoe's south shore and Fallen Leaf Lake from 9735 ft., while chugging Gatorade and eating trail mix and beef jerky.

The cliffs made me nervous and sick to my stomach and I insisted that the kids keep a large distance from the edge.

Was it worth it?  Well, I probably would have enjoyed it more had I a helicopter.  After 
Almost there! High above Lake Tahoe and Fallen Leaf Lake
climbing 3500 feet over 4.5 miles, there was now a 4.5 mile 3500 foot descent to be reckoned with.  Many say that going up is harder than going down, but for me it is the opposite. Sure the cardio aspect is less, but the muscle work is harder, and for me, the toes and feet pain is the worst.  Much of the trail is covered in bedrock, which is unstable and very hard on your feet. There is no choice but to keep going, so you endure.  The last 1.2 miles past Floating Lake was the longest of my life.  Sheer agony.


I'm in really good shape, but my quads were wicked sore for two full days.

You should do it once, to say you did.  But do it when you're young.  We concluded that this hike really is a 6 out of 5 on a difficulty scale.  Make sure you have plenty of water.  Don't even think about trying this trail if you don't have hiking boots.  Got that?  Don't even think about it!
The long road home


Everytrail.com has a nice description of this hike.

Camp Richardson Ice Cream Parlor

Well it was time to fulfill my promise.  A right turn out of Mt. Tallac Trailhead road, followed by a short trek down the road and you arrive at Camp Richardson and more importantly the Camp Richardson Ice Cream Parlor on the right side of the road. 

Free parking is somewhat of a challenge so it is safe to drop your party off and let them wait in the line likely out the front door while trying to park.  The kids working are efficient and friendly, so the wait is not painstaking, and BOY do those kids know how to cram ice
cream in a cone!!!!!!  If you have any consideration for calories at all, avoid anything larger than a kids scoop--which is PLENTY at $2.50.  With our 20000 steps and 7000 feet under our belts, we went for the single scoop for 4$ which was like two if not three large scoops if you were anywhere else.  There are about 20 flavors including some sugar free, with plenty of options for sundaes and toppings.
$20 well spent--probably put back everything I burned on that trail!

I had trouble getting exact hours but I know they are only open Memorial Day through Labor Day and probably open til 9 pm.

Pope Beach

Now if you need to get into some icy waters to cool your muscles following your long hike, or you just need a place to spend the day on a wide open beach, right down the street (Highway 89)  from Camp Richardson is Pope Beach.
The entrance fee is 8$, but this gets you into Baldwin Beach, Nevada Beach and Meeks Bay beach as well, should you decide to go there the same day.  The beach does fill on the weekends, but just because there is a sign out saying the beach is full, as when we went Sunday at 3:30, it doesn't mean it is, so it is worth waiting in the short line to check at the kiosk.

There is plenty of parking with easy access to the beach, shade, picnic tables, and plenty of bathrooms.  There is a "Tahoe Treats" lunch truck--but I only saw this on Sunday.

This beach is not as nice in my opinion as Sand Harbor State Beach.  The water is greener as opposed to blue and has more "stuff" in it, especially on a busy day.  But it costs less and is closer to the center of South Lake Tahoe activities.  The water is just as clear and refreshing.
We loved it so much we came back the next day!


My little crew enjoying lovely Pope Beach


South Tahoe SUP

I decided it was time to try out some kayaking. I had often seen people gliding along the
lake, enviously awaiting the day we could give it a try as a family. I decided that day had come and I was looking for rental possibilities.

South Tahoe Stand Up Paddle is conveniently located on Eldorado Beach in the South Lake Tahoe area.  The rental booth is easy to spot.  All registration is conveniently recorded on tablets.

They basically rent two things, stand up paddle boards and single and double kayaks, from 7am to 7pm, 7 days a week. A standard stand up paddle board is 20$/hr, $35 for two hours and $65 or the whole day.  A single kayak respectively is $25, $45, and $80, and a double kayak $30, $55, and $105.  A season pass is available for $275 for an adult, seems pretty good considering you can go for a few hours every day between May 15 and Sept 15, should you be so inclined!

We rented two double kayaks and a single kayak, trusting the fourteen year old to hold her own in the single.  We were in the water by 10 and kayaked until 12. Viewing scenery by kayak is quite peaceful, and the view from 3-4 hundred feet off the shore is one that beachgoers will not get to see typically.  We were able to paddle almost all the way to Pope Beach in one hour, so it might be possible to make it to Emerald Bay with a full day rental, though sitting in a kayak all day may be uncomfortable for many.  The water was quite shallow, 3-5 feet mostly so we were able to jump out and swim and then get back into the kayak without too much difficulty.

Kayaking itself, unless you hit quite a headwind, is not very difficult, and, at least in Tahoe, is a safe activity the whole family can enjoy.

What's New at Round Hill Pines Beach and Marina?

If you have been reading by blog for a while you might have seen my post last summer mentioning the shift of our loyalties from Zephyr Cove Marina to Round Hill Pines Marina when renting personal watercraft...

Ride it like you stole it!!!
A few policies changed at Round Hill Pines, so here is the deal...

1)  Now you need to present a coupon to get the Early Bird discount (before 10).  We didn't have it and they didn't give it to us.
2)  Every driver is required to present their driver's license to drive the jet ski.   I never carry mine, and though I am always concerned that I don't have it, they always let me drive.  Anyway, since Craig had his, they allowed me to drive.
3)  Only two to a jet ski.  They said that this is because people are constantly rolling the jet skis requiring them to rescue renters and their hired watercrafts. I guess more weight increases the risk.  They let us take three if two were kids, never mind that Natalya weighs as much as a small adult.  We promised them we were not daredevils and that they didn't have to worry about us flipping the jet ski.

But Craig flipped his.  He was carrying Nicky and Natalya, i.e. he was driving the jet ski with three people.  He was at almost a full stop and a wave just pushed them over, so it really was no fault of his own.  He got it flipped right back over, so they were not in need of rescue, but there were some tense moments as the crew examined the engine of the once capsized watercraft, assessing our liability.  Not to mention feeling incredibly sheepish after our earlier moments of bravado regarding our jet skiing prowess.

Are we done jet skiing?  Maybe.  The kids are only going to get bigger, very soon mandating that we rent a third PWC, and then who's going to drive it is another issue.  It's a hoot and a half, but it's really expensive.  In fact, we could rent 5 stand up paddle boards with South Tahoe SUP for two hours and it still would not cost as much as it costs to rent just TWO jet skis for half an hour at Round Hill.  Hmm.  Not much competition when we're talking bang for your buck.

What's New at Sand Harbor State Beach?

This might not be new at all.  Maybe we never noticed it before, but suddenly you are able to rent SUP's and kayaks right on the beach at Sand Harbor!

Sand Harbor Rentals rents basically the same things that South Tahoe SUP rents, for about $5 more per hour. Location, location, location, I guess.  The rental canopy is located by the boat ramp, at an area of Sand Harbor Beach I had never ventured upon before!  Here is a little cove, with a little beach, the only area in which you can have a hard bottomed craft in the swimming area.  Some have their boats moored right along the beach!

Anyway, we had never SUP'd (sorry, just got tired of writing it out every time!) at Lake Tahoe and we were eager to give Nicholas some practice time on a still lake before trying this in Hawaii in a few weeks, so we rented two SUP's for one hour, just to play around a little.

Paddleboarding is tricky, but once you get the hang of it, it's a blast.  The trick I found is to start paddling immediately upon standing up.  This stabilizes the board.  Trying to balance on a non-moving board is a great lesson in frustration!

Once again, everyone can do it!  You can even have a small child or a dog as a passenger!  On Lake Tahoe you can get great exercise while enjoying great scenery and great water!

Okay that does it for Lake Tahoe!  Now I'm off to Hawaii!  Trying desperately to get this posted.  Sorry about the lack of personal pictures, but my water camera was in disrepair and we did do a lot on the water!!


Related Posts Plugin for WordPress, Blogger...